Tuesday, 31 January 2012

Vehicle Texturing Project

Hi there, its been a long time but I'm with a post. I basically wanted to work on a texturing project and I had a vehicle that I always wanted to texture but I never had time to texture it.


I did some changes to the silluete and fixed some geo flow in th back part of the car. The model was kinda old so I had to basically go through it and see what I liked and worked.


I also has to fix a lot of the interior of the car and I might be adding some more stuff but at the moment im happy with the model.


So after that I decided to have 2 UV sets for this model, I wanted to have a lot of resolution space for the main body of the vehicle and fitting all the parts of the vehicle in one UV map would had left a lot of parts with extreme low resolutions for texturing.


Well now it is time to texture!!! I will be posting a new update later today, hopefully I can have the diffuse map for at least one of the UV sets. I'm learning how to use a new tool for texturing so hopefully I can have something decent later.

Wednesday, 25 January 2012

Back to my other project


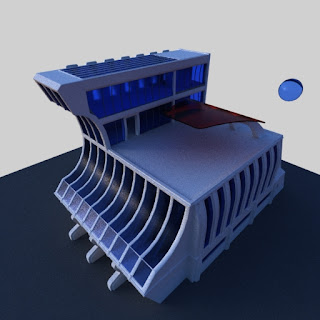
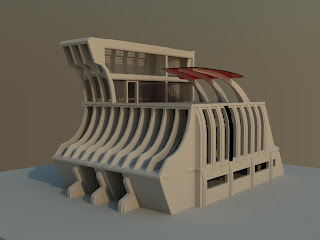
Hi there, well afeter working with that building for a while and getting at the end some decent renders I decided to go back to my futuristic building and start working on the material and lighting.


I changed my original lighting on it. I was using VRay sun and sky, and it got me some pretty nice results but I wanted to try the HDRI way that I used with the other building.


I found that Maya tends to crash a lot with this scene for some reason so it took me a while to get this renders, but overall I would say that I will be using HDRIs to illuminate this scene.


I will update tomorrow with the basic color and shaders I will be using.

Tuesday, 24 January 2012

New Renders and Tests

Hey I kept working on the renders and changed the camera so that I could get the building looking a little bit more imposing.


I tried to use some different HDRIs to get different lighting and intensity. This is another render with the same HDRI but with it rotated.


I tried a different HDRI map on this one, it had more blue from the sky.


I think I like the last one the most, but I would like to try maybe to bring up the lighting in the bottom right corner of the building.


Monday, 23 January 2012

Building Update

Hi there,

I have not been able to upload anything on the past couple of days but I finally got a decent render.
I been playing around with the VRay shaders and trying to get the HDRIs I got to work like they should. I can say that it took me a while to finally get the settings right. Now I have been working on shaders, mind that they are pretty basic shaders and I'm in the process of getting to understand them. Here is the picture:


I know the walls don't look that fancy and that plastic looking set of stairs look out of place too lol but I'm hoping later today I can get something a little bit better.

Friday, 20 January 2012

Working with VRay HDRI

Well as the title sais I been working all day with VRay HDRI and the result, well lets say I either need a better HDRI image or I'm having some trouble setting the option on it because the best result I got was this.


Now it might be because I not using VRay materials or maybe im letting too much light with camera but I can't seem to be able to get something better. I will be trying some VRay materials I found from the internet today so hopefully this gives me a little better results. Well after some quick touch ups in Photoshop and I got something with a little more contrast.


Hopefully with a little bit more testing I can get better results.

Thursday, 19 January 2012

Update for the Day

 Well today was a long day but I got to lear a lot about VRay sun and sky and the different materials you can use in VRay. I had some previews experience using Maya sun and sky and working with indirect illumination and photon with mental ray, but I got to say that I like the way you can do things in VRay.


First well I played around with my settings and got this picture which was pretty overblown by the settings I had in the camera.


The cool thing about VRay from what I have found so far is that you can actually control the ISO  and Shutter Speed of the camera which lets you control th amount of light that gets into the scene..


With very little effor I was able to get a big variety of lighting conditions depending on the direction you moved the sun. So far I would say that the way this sun and sky works with VRay is more of my liking that the mental ray one that comes with Maya.


I also had some time and finally was able to use Zbrush after a long time and sculpt some rocks, nothing that detailed but good to get me going again.


Tuesday, 17 January 2012

Work in Progress


I would just like to begging by explaining a little bit the idea behind this building. I read a series of books called Red Mars in which a mission is sent to Mars to colonise the planet. I won’t go into specifics but there is a period of time where they live in tent cities that protect the people from the atmosphere outside. I wanted to create my vision of how one of these buildings would look like. I tried to make the building look modern but at same time alien in some way.

I began by pretty much modeling a group of building inside a tent.  


The reason why is because I wanted to get an idea of scale of the tent in relation with the buildings.


I then lined up the block outs of the buildings to look at what shapes and silhouettes I liked the most in each one.


I also detailed some of them to if I could get any further or not.


I ended up deciding to use the one on the far right


After doing some details I realized that I liked the way the building looked but the width and length where not enough


I decided to expand the width and length. I then continued adding details to the model and ended up with this render, which is just a simple mental ray render with a Maya sun and sky light.


I will now start working on the materials and textures for the building.